
Home Theatre Design
Things that separate a good cinema from a great one.
Drawn from over six years of professional home theatre installations, attending ISF calibration courses, and audio calibration training courses. This vast knowledge and experience is now available to you in Canberra and the ACT.

01 — Foundation
Good plan, Great restults
Careful planning is the foundation of an exceptional outcome. When executed properly, it not only elevates the final result but also helps avoid costly mistakes — after all, measure twice, cut once. A professionally developed 3D model can play a critical role in visualising the space and eliminating potential issues before they arise.
- The optimal speaker configuration based on room size and acoustics
- Seating design — particularly for tiered layouts. A scaled drawing ensures front-row seating doesn't obstruct sightlines, and tier height directly influences ideal screen height.
- Screen size, determined by room dimensions, viewing distance and the projector's throw ratio. Orienting the cinema along the longer dimension significantly enhances the experience.
- Strategic equipment placement with thorough consideration of noise management, ventilation and cabling infrastructure

02 — Installation
Wire It Once, Wire It Right
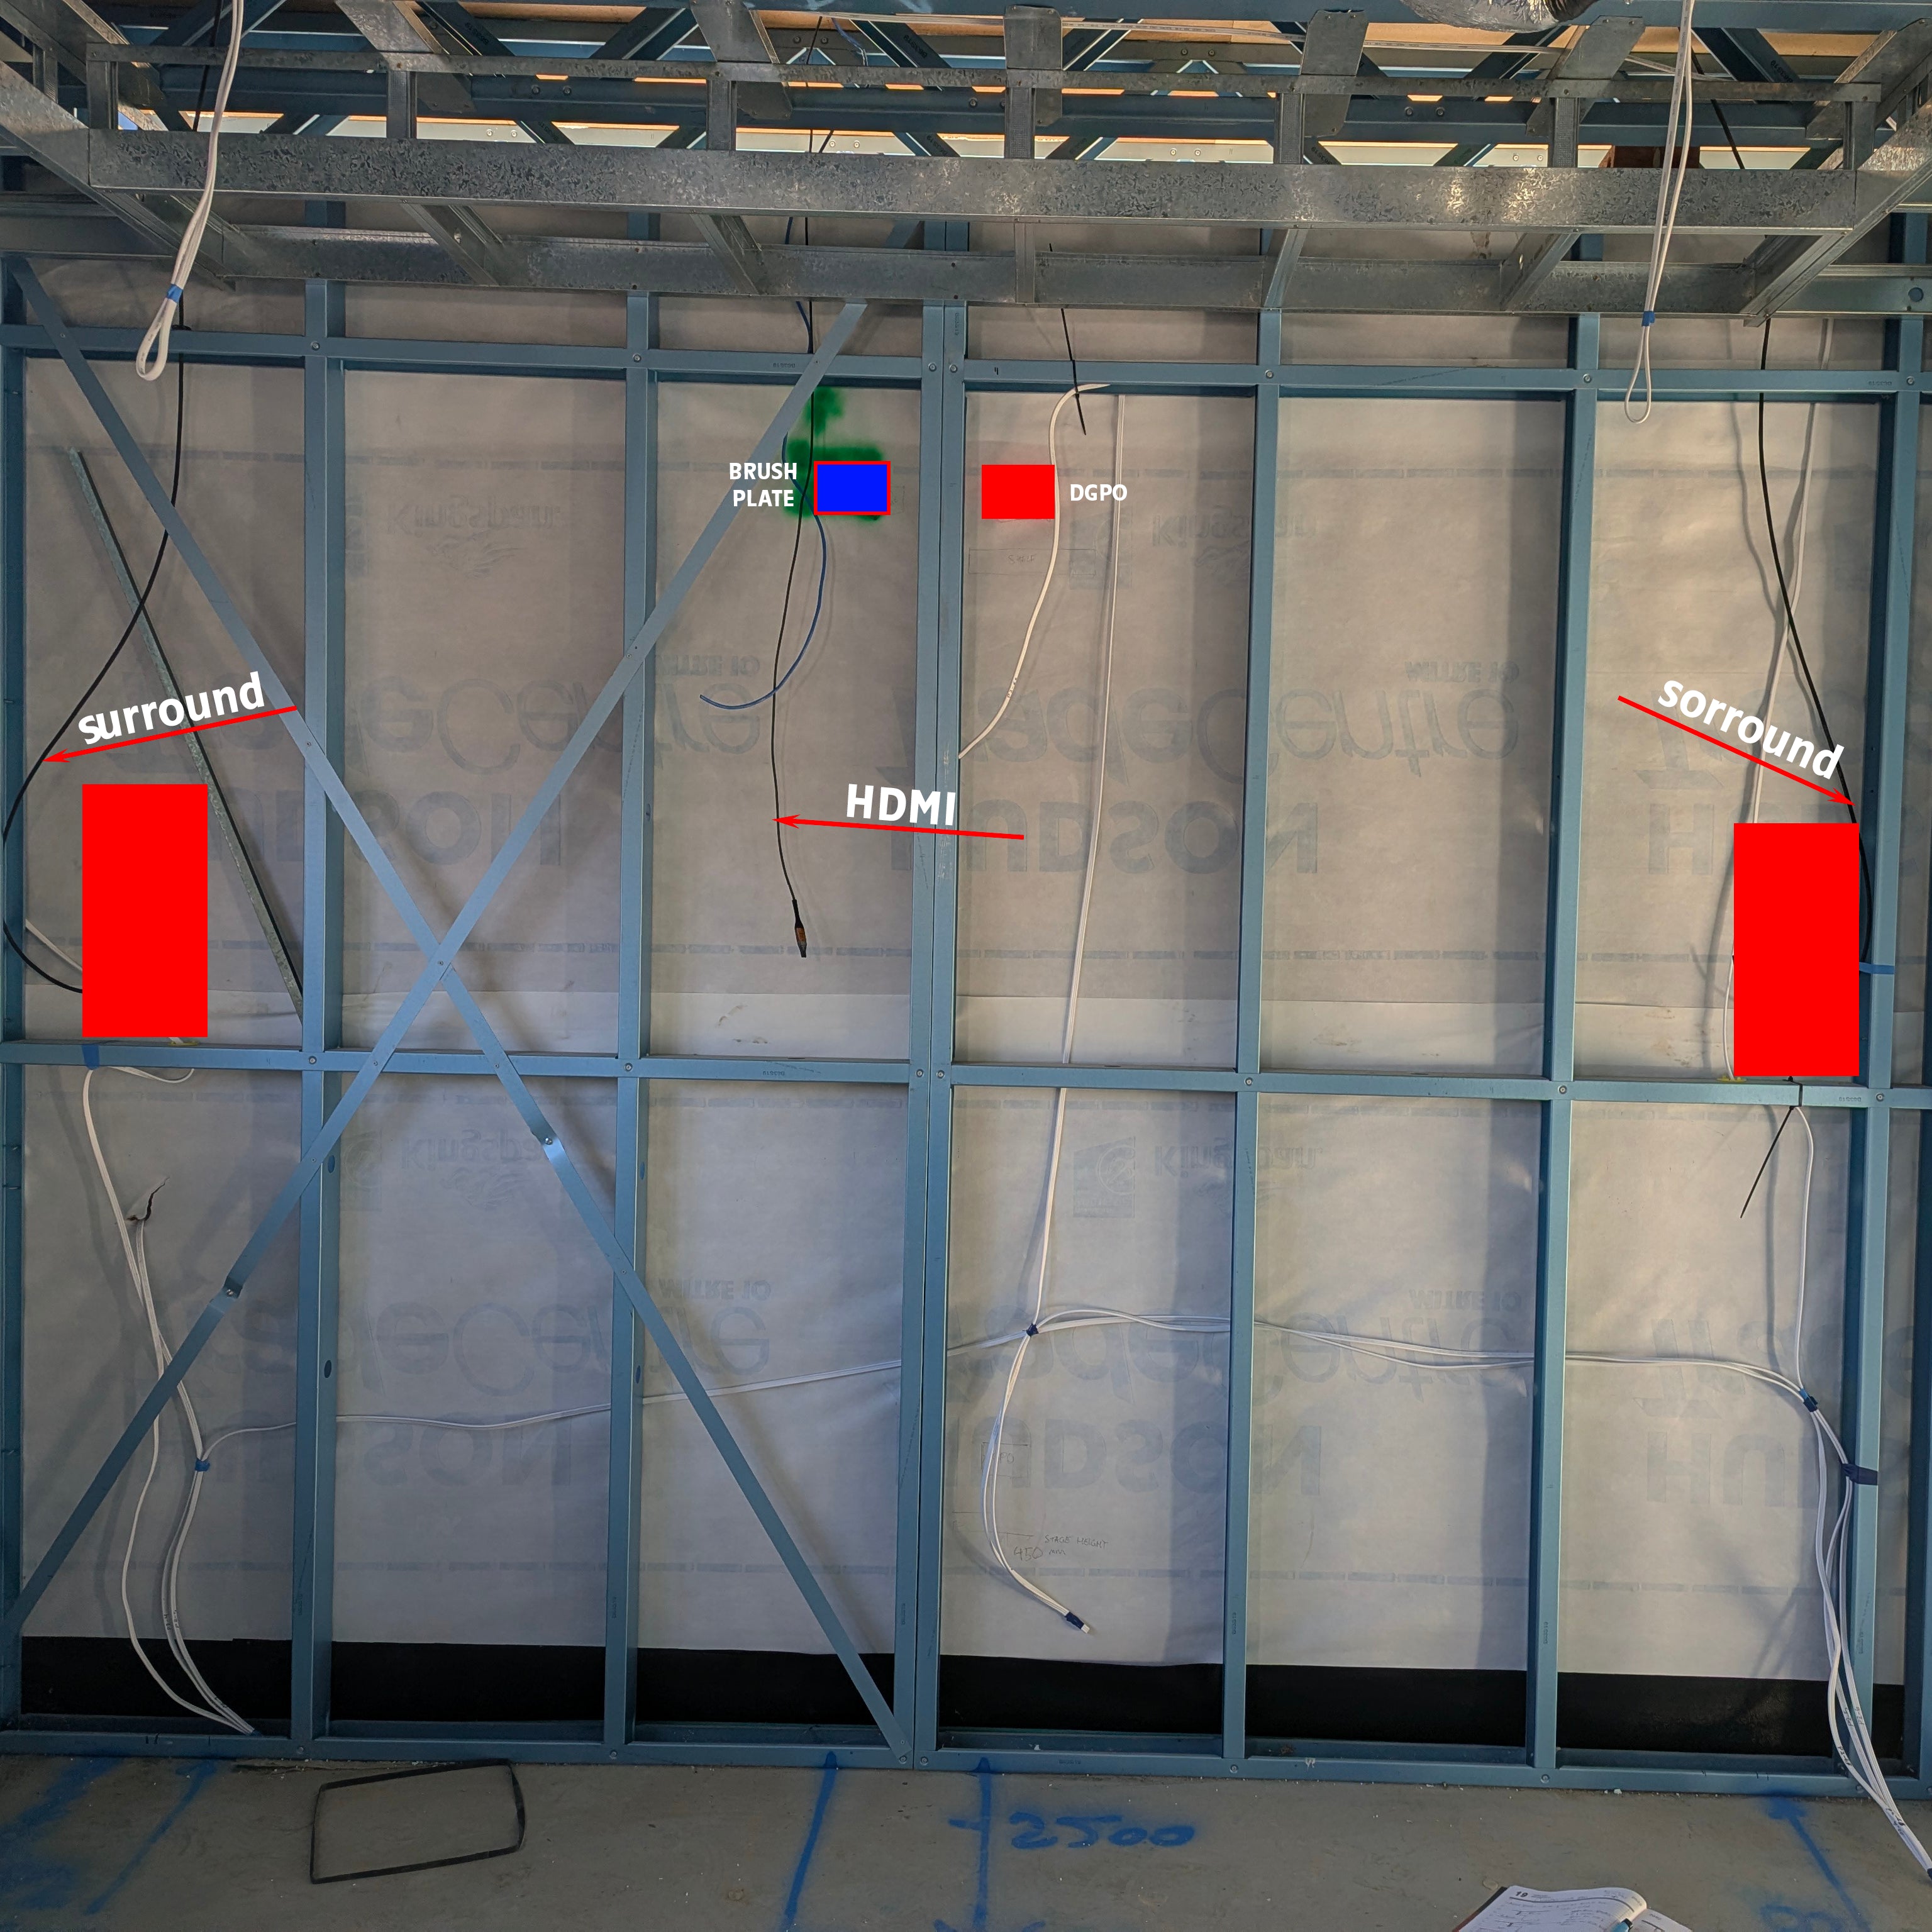
Mistakes in a home cinema setup are far more expensive to rectify than getting it right the first time. A common misconception is that general electrical experience translates into expertise in cinema installation — in reality, it rarely does.
Common issues we see include incorrect HDMI cabling, poorly positioned subwoofer placements and unsuitable projector mounting locations.
The hidden cost of cutting cornersThese mistakes often cost more to fix than installing the system correctly from scratch. Walls need to be opened, cables replaced entirely, and mounting locations rebuilt. Involve experienced professionals at the right stage — so your system is wired once, and wired right.

03 — Display
Screen Size, Bigger is not always better
Projectors are designed with varying throw ratios, which determine the size of the image they produce at a given distance. Two projectors mounted at the same distance can deliver vastly different image sizes.
Homeowners often select projectors and screens without fully considering room dimensions or the maximum image size achievable in the available space — resulting in a system that never reaches its full potential.
LUMIFI has developed a fantastic tool you can download here that will work out the recommended screen size based on your viewing distance. It also works out the mounting position of your projector along the length of the room based on its throw ratio and your screen size . It also has tools that work out the physical size of your screen (based on the diagonal size and the frame width). It also works out the reflected brightness based on your projector's available lumens and the gain value of your screen material. All you have to do is fill values in the yellow cells.
Use the calculator before you buyMost projector manufacturers provide online projection calculators. Use them to accurately determine the ideal screen size, screen height and projector mounting position — ensuring everything works seamlessly from the outset.

04 — Acoustics
Acoustic Treatment, Take your investment further
Many homeowners miss the opportunity to dramatically improve their cinema experience through acoustic treatment. Simple treatment applied in the right spot can bring massive improvements to dialogue intelligibility.
Placing absorbers on the first point of reflection alone can solve the age-old problem: "What did he say?" Acoustic treatment reduces the reverberation time of your cinema substantially — delivering a far better sonic experience without a complete room rebuild.

05 — Bass Management
Bass, the more the better
Reverberation time is typically higher at low frequencies because low-frequency wavelengths are much longer — creating standing waves that produce areas of reinforced bass and "nulls" where bass disappears entirely.
One of the most effective solutions is the strategic use of multiple subwoofers positioned along the length and width of the room. Three subwoofers typically provide better coverage than two, and four better still.
Bass is the most important component after dialogue intelligibilityGetting it right requires both multiple carefully placed subwoofers and investment in acoustic calibration software such as Dirac Live.

06 — Calibration
Calibration, Get the best out of your system
High-end home cinemas and professional theatres rely on precise calibration of both video and audio. The two industry-leading tools are Calman for video calibration and Dirac for audio calibration.
Calman ensures your projector reproduces colours, contrast, brightness and gamma to industry standards — Rec.709 for HD or DCI-P3 for digital cinema. Dirac measures sound at multiple listening positions, creating digital filters to correct timing, phase and frequency response.
Paired together, Calman and Dirac take a system from "good" to truly professionalFor enthusiasts and audiophiles, this calibration is not optional — it is essential to unlock the full potential of a high-end home cinema.
07— Call us
Not sure, call the experts
Don't let indecision stall your project. Contact us today for expert advice with zero upfront commitment. Our high-value "Rough-In" packages future-proofs your space, saving you from costly future alterations. This package includes a site consultation, premium cabling, professional pre-wiring labour, and full documentation to easily locate your cables later.
Don't waste thousands fixing wrong or cheap cables. Invest that budget into a higher-performing system insteadWe use premium Kordz cabling and provide complete photographic documentation of your setup. This layout transparency gives you total freedom to choose any provider for your final home theatre fit-out
Cost guide
Home Cinema in Canberra - a detail guide
Insights - Surround sound system in Fyshwick, home theatre in Canberra , Luxury Cinema-at-home in ACT
The cost of a home theatre depends on what you are really aiming for. If you live in an apartment in Phillip in inner South Canberra and want to improve your existing TV's sound, you can get away with a soundbar plus a powered subwoofer for around $2000 from brands like Sonos or Denon, and you will get a huge improvement in your TV sound.
In another scenario, say you live in a four-bedroom house in Googong with a dedicated theatre room. You're used to enjoying your dedicated theatre room and want to improve the sound of your TV in the family room. The dedicated theatre room experience has lifted your expectations, and you may not feel satisfied with a soundbar. You may want to invest in a passive soundbar or three in-wall or on-wall speakers, an AVR to power them, along with a small passive or active subwoofer. Such a setup is likely to give you much better performance when compared to a one-box solution. A system like this can range from $ 3,500 to $5,000. The choice of soundbar (versus in-wall speakers), the subwoofer, and the AV receiver will determine the final price.
In another scenario, a 4.2 x 3.6 m spare room in a newly completed house in Denman Prospect needs to be converted into a home cinema. It could be a house in Jacka, Taylor or Whitlam in need of a dedicated theatre room. In a room of this size, we would recommend a 120-inch acoustic screen with a 5.2.2 system. At LUMIFI, we strongly believe in using two subwoofers instead of one. A multi-subwoofer setup will give you more uniform bass across multiple seats. If budget forces you to choose between one big, pricier subwoofer or two smaller, cheaper subwoofers, we will almost always advise choosing two smaller ones. If you are on a tighter budget, we would recommend a projector like the BenQ 2720i or a Valerion Pro. A room of this size can cost from $15000 to $20000.
Let's say you are doing a demolition and rebuild project in established larger block suburbs like Wanniassa, Kambah or Banks. You are a home cinema enthusiast and specifically asked your architect to design your home with a 6m x 4m dedicated theatre room. For rooms of such dimensions, we advise that you seriously consider a high output (SPL) system. Longer rooms would usually allow a larger distance between your front speakers and the seating position. Larger viewing distances also open up more options for larger screen sizes. We would recommend a 130 to140 inch acoustic screen with a 7.2.4 Dolby Atmos system for such rooms. We would also explore a 4-subwoofer system for rooms of this size. The cost for such a system can range from $25,000 to $40,000. The $15,000 variation will depend on the choice of AVR, projector, and number of subwoofers. We would also consider taking some of the load off the AVR and passing it on to a power amplifier. We highly recommend considering more premium laser projectors from brands like BenQ, Epson or JVC.
Say you are building a mansion on beautiful acreage in the suburbs of Sutton, Royalla, Burra, or Wamboin around ACT, with a dedicated large room of 7 x 5 meters. We recommend a 160 to 180-inch cinematic aspect ratio screen (2.35:1), a high-SPL system from Ascendo, a dedicated AV processor, and a power amplifier for all speakers. In addition, we recommend 4 high-SPL subwoofers for a room of such proportions. A Native 4K laser projector from JVC is highly recommended for a high-end system like this. A room of these proportions, when done right, can cost from $55,000 to $95,000. The range is wide, and the final price and performance will depend on your equipment choices, level of acoustic treatment, number of subwoofers, and the quality of the AV processor and power amplifiers. If you go north of $90,000 in spend, you will end up with a system that will beat the experience of your local commercial cinema.
Let's now take the example of a die-hard Hollywood or Bollywood fan building a dream home cinema in the upmarket suburbs like Forrest, Deakin, Red Hill, Griffith or Yarralumla. You have an 8 x 6 metre room. The brief is to design a system that you enjoy while you live in the house. You also want the cinema to be a USP for the house if it ever goes on the market. LUMIFI has access to brands where a single front speaker behind the screen costs over $200000. When powered by high-quality, powerful amplifiers, these speakers deliver performance that exceeds their price tag. We have access to the knowledge of designers of these very high-end systems and can involve them (if needed) to deliver your dream theatre. Systems designed with such briefs can
range from $120,000 to well over six figures.
In Summary: Sound improvement solutions in Canberra and the Australian Capital Territory available from LUMIFI can be broadly divided into three categories.
- Surround Sound
- Dedicated home theatre room
- Cinema-at-home.
1. A surround sound system will bring a substantial improvement to the sound around a TV, usually in a family room or lounge setting. These systems can cost as little as $1500 and go up to $5000, depending on the final speaker configuration.
2. Dedicated home theatre costs in Canberra can typically rang from $15,000 to $90,000. At the upper end of this wide range, you'll get a fully calibrated high-SPL system with 11 speakers, 4 subwoofers, a processor, a power amplifier, a 4K Laser projector, some acoustic treatment, and potentially a small optic fibre star ceiling system.
3. A cinema-at-home system can start from $100000 and go all the way into 6 figures and beyond! At the upper end of this very wide price range, you will potentially end up being the owner of a cinema-at-home system with a top-of-the-range processor from Trinnov, a projector from Barco, four high-quality kick subs, a few infrasonic subwoofers powered by over 100,000 Watts, a video source like Kaleidescape, a video processor with a huge automatic two-way masking screen to suit video content with almost all aspect ratios and a high-end home automation system from Crestron.
Let's discuss factors that contribute to the final price and outcome in more detail
Room Size
In a larger room, more speakers will be needed for more uniform coverage. In a smaller room, we usually have one row of seats and may need only five speakers at bed level and two in the ceiling. A larger room may require seven, nine or even more speakers at bed level. Similarly, we will require four, six or even more speakers in the ceiling. More speakers require an AVR with more channels and more powerful amplification. In larger rooms, we will sit farther from the speakers. The front three speakers will need to play at relatively high SPL. (as distance eats into SPL). To meet this requirement, we will need more watts on our amplifiers. We'll also need more subwoofers for more uniform bass distribution across the room's width and length. Larger rooms will also require more acoustic treatments on the walls. A bigger screen is required to achieve the same immersive experience you get with smaller screens when you sit closer. Naturally, a brighter projector is required to light up larger screens. More speakers, more subwoofers, an AVR with more channels, bigger amps, a bigger screen, and a brighter projector will all increase cost. Room size is the single biggest determining factor in the final cost of your system.
Decades-old discussion: TV or PJ
Before we compare video, a projector lets you use an acoustically transparent screen, so you can place all the speakers and subwoofers behind it. Speakers placed behind the screen will always give you better soundstage and a more immersive and accurate audio outcome. A more pleasing aesthetic outcome is a bonus in such installations.
Televisions are usually brighter than projectors. High brightness is not always good in a darkened room. A super bright screen can get very uncomfortable in a darkened room. It's okay if a scene in a movie requires a display to reach its peak brightness for short bursts of time. This would usually be limited to a few ultra-bright scenes. Continuous brightness can become overwhelming and tiring in a darkened room. This is why a projector is a clear winner in dark rooms.
The overall image your eyes see, and your brain perceives, is the combined result of the projected image and the ambient light falling on the screen. Hence, in a room with ambient light, a projected image will lack the pop and look washed out. In rooms with uncontrolled ambient light, Televisions or LED walls will always win against a projector.
Let’s clear another confusion that exists equally amongst consumers and prosumers about projectors capable of high brightness. There is a false understanding that projectors with high brightness are designed for rooms with uncontrolled ambient light. The increased brightness built into projectors is in fact for an entirely different purpose. To understand this topic further, we have to step back into the recent past. Before the arrival of laser light sources, consumer-grade home theatre projectors with lamp light sources couldn't produce true HDR images, which require brightness in the range of 300 nits. The next best thing was to display all images on a relative scale using a function built into their projectors called HDR tone mapping. With the arrival of laser light sources capable of very high lumen output, manufacturers are making brighter projectors so they can display true HDR images instead of using HDR tone mapping. The Epson Q7000 comes with 10000 lumens and can produce 300-nit images on a substantially large screen, allowing it to display HDR without relying on HDR tone mapping. A projector with higher brightness will not necessarily perform better than a projector with lower lumens. What matters more is how the manufacturer implements that higher brightness and delivers a great HDR image across the overall system. A DLP projector claiming 7000 lumens doesn’t always make it a better projector than a JVC with a humble 2600 lumens. The light source is one component of a projector. Optics quality and the image processor play a huge role in the final outcome.
JVC has laser projectors starting at $10000 and going up to $40000. BenQ has projectors starting from $3200, with their flagship laser projector with all-glass optics costing $8000. Epson has great laser projectors starting at $6500, with models like the Q7000 capable of 10,000 lumens with true HDR images costing over $25000.
Screen type, size and quality
It's always challenging to convince customers away from bigger screens. Quite a few customers are of the opinion of getting the biggest possible screen into their cinema. They tend to believe that there is no science to the choice of screen size. When we say "bigger", we mean bigger than what would be suitable for the viewing distance and the brightness of the projector.
Customers initially don't realise that choosing a cinema screen size involves calculations. We would do some basic calculations and recommend screen sizes based on the available viewing distance. We would then ask the customer where they prefer to sit when watching movies in a commercial cinema (front, middle, or all the way back). The process may also involve asking the customer to move between a few seating rows in our demo room. After carefully reviewing your answers and our demo room findings, we will provide a final screen-size recommendation. The aim is to recommend a screen size that is large enough to be immersive. At the same time, we don't want it so large that you have to move your eyes or neck to see the entire screen. Screen size also depends on the projector's throw ratio. We recommend deciding on screen size first, then looking for projector options that can fill that size in your room.
The final picture produced by a projection system is the combined result of the projector's capabilities and the screen's quality. In our experience, customers are often dismissive of investing more in higher-quality screens. Our job is to remind them that they will not get the same quality picture that they see in our demo room if they opt for cheaper screens. A screen is expected to last well over 15 years. A high-quality screen delivers a superior image and better acoustic performance. We highly recommend investing in good quality screens. A screen from China can cost between $1,500 and $3,000, depending on quality and diagonal size. A high-quality European or US-made screen in the same size can cost up to three times as much. A fixed screen will usually cost less than an electric screen that rolls out of a ceiling cavity on demand. Electric screens are usually more suited to multi-purpose rooms, used as part-time cinemas. You can also use them with a wall-mounted TV for everyday viewing and call up the screen occasionally when you are in the mood for a session with more controlled lighting. If you project demands a motorised screen, we highly recommend a tensioned screen so you don’t see any creases. A high-quality motorised tensioned screen will cost more than a fixed screen, even though it offers a relatively inferior viewing experience.
Choice of Electronics
One of the big variables in determining the final price of your home cinema is the choice of Electronics. You can get some very competitive products from brands like Denon, Onkyo and Integra to power your small home cinema. These brands specialise in great one-box integrated solutions that include both processing and amplification. When reading the power specifications of these one-box solutions, always look at the power rating with a THD (total harmonic distortion) of less than 0.1%. Power ratings above this THD level are almost unusable, as the sound is too distorted and can potentially damage audio equipment and human hearing. Furthermore, manufacturers' power ratings are usually based on the AVR driving only two speakers. In a surround sound system, an AVR is usually driving 5 or more speakers. The simplest rule to remember is, no amount of power is too much. Don’t get caught up in the recommended power rating of your speakers. Always give your speakers more power than they are rated for. AV receivers that can power more channels would usually have more power handling. For example, a Denon AVR-X3900 and a Denon AVR-X4800 can both power only 9 channels. However, the Denon AVR-X4800 is rated for 125W per channel, whereas the AVR-X3900 is rated for 105W. The bigger, more powerful AVR-X4800 will usually have a larger power supply and more control over your speakers, especially when playing lower frequencies at higher SPL. In such cases, if the budget allows, always go for the AVR with bigger power reserves.
Another important AVR spec is the availability of pre-outs. Pre-outs will give you the choice to take some of the load off the AVR and pass it on to a power amplifier. This future-proofs your investment and lets you get much more out of your speakers.
Another specification to watch for is your AVR's compatibility with calibration software like Dirac, Audyssey, and ARC (Anthem room correction). All three calibration platforms are great tools to get the best performance out of your system.
We highly recommend using AVR’s from the Denon X series and Onkyo RZ series. Our favourite AVR for small cinema systems is the AVRX-3900H. It has 9 powered channels and 11-channel processing with pre-outs for all 11 channels. It’s compatible with the complete suite of Dirac software, including their latest ART. A good one-box AVR solution for a small cinema can cost about $2,500-$3,000.
For high-end systems, we recommend using a dedicated processor from brands like Audiocontrol, Marantz and Arcam. These processors are capable of 16 or more assignable channels. They are usually compatible with all the latest formats from Dolby, DTS, and Aura3D. The inclusion of high-quality DAC(s) and powerful processors is usually standard practice. These high-quality components will give your audio more clarity and separation. A high-end processor from Audiocontrol can cost up to $15000.
Our favourite go-to brands for power amplification are Rotel and Audiocontrol. Rotel is famous for making tank-like Class AB power amplifiers. Audiocontrol specialises in bulletproof, high-power Class H and Class D power amplifiers that run much cooler than Class AB amplifiers. Both world-class brands have the experience and engineering know-how to make great power amplifiers backed by a solid warranty. They give you an honest and conservative all channels-driven power rating on their power amplifiers. Power amplifiers from these brands start at $2800 and can go up to $8000, depending on the number of channels and their power rating.
Speakers and Audio
Audio quality is where most people underinvest and where the experience gap between tiers is most noticeable.
At the starter tier, Sonos or Denon soundbars with an active Sub and rear satellites deliver Dolby Atmos in a compact, aesthetically clean package that suits living rooms perfectly. Such an entry-level system can cost about $3000.
At the mid-tier, Klipsch brings enormous value for money and gives the best bang for your buck. A system with seven speakers and one subwoofer can cost about $7000.
In more premium setups, Origin Acoustics and Monitor Audio are hard to beat. Both brands offer an extensive range of custom in-ceiling and in-wall speakers and deliver top value for money. A 9-speaker and 2-subwoofer system from these brands can cost from $7000 to $15000.
For high-SPL systems, we highly recommend speakers, subwoofers and amplifiers from the German brand Ascendo. In this category, the range and options are so wide that it's hard to give a price guide. A 7.2 configuration can start at $15000 and go well over 6 figures.
Subwoofer Quality and Numbers
There is bass, and there is BASS. This is the most important and the most enjoyable aspect of a home theatre. Adding more subwoofers not only increases the system's overall SPL but also provides more uniform bass distribution from seat to seat. Strategic placement of multiple subwoofers can also help reduce the decay time of low frequencies and deal with "low frequency standing waves" in the room. Infrasonic frequencies are usually outside of the human hearing range. These are frequencies that are felt, not heard. You need infrasonic subwoofers and powerful amplifiers to play these frequencies cleanly. Infrasonic subwoofers and the amplifiers required to power them come at a fairly high cost. Once you experience these systems, you can't go back. If you want some serious bass in your home theatre, we recommend that you set up your system with 4 kick subs and at least one infrasonic sub. These 5 subs, when phase-aligned, will deliver clean, punchy, tight bass that will keep you coming back for more! A good quality single subwoofer can start from $1500 and a infrsonic multi subwoofer system from a brand like Ascendo can go all the way to well over $100,000.
Acoustic Treatment
When you play a sound in a room through your system, you hear the combined effect of the system and the room. A room with poor acoustics can make a very capable system sound bad and vice versa. Acoustic treatment is the science of placing absorbers and diffusers in strategic locations on the walls and ceiling to counter reflections in a room. In a dedicated theatre room, the most important goal of acoustic treatment is to improve dialogue intelligibility. This is one of the most important areas of a home theatre sound system, yet we've found it challenging to convince customers to invest in acoustic treatment. The absolute minimum we recommend is to treat the first point of reflection of your centre speaker (for all rows). This is usually done by installing absorbers on the walls and ceiling. This will hugely improve the dialogue intelligibility of your system. The good thing about acoustic treatment is that you can do it later. We highly recommend holding off on investing in audio calibration till acoustic treatment is complete. Allocate a minimum of $2500 for acoustic treatment and well over $10000 if you would like your room to be treated extensively.
Audio and Video Calibration
To get the best out of your system, you need to calibrate your audio and video. ISF-qualified calibrators perform video
calibration using precise, albeit expensive, optical tools and software from Calman. LUMIFI can get you in touch with qualified calibrators. You cannot do video calibration by eyeballing the picture. The video calibrator will usually connect his video signal generator to your display. Then he sets up a highly accurate colour meter to read your display's image. The image is then fed into software like Calman that lets the calibrator compare the input video signal to the readings from the spectrometer. He then goes into your display's advanced menu to adjust your colour management system and reduce the error to a level the human eye can't perceive. Professional video calibration can cost $1000 per HDMI port, provided the calibrator is travelling in your area for other calibration jobs.
Audio calibration requires far fewer tools, and the software is usually available to download for free from developers like Dirac. However, you will need to invest in a Dirac license to be able to complete and upload a calibration session. If you are confident going down the DIY path, we suggest investing in a good measurement microphone. A Dirac ART license bundle can cost almost US$900 and $400 for professional fee.
Once calibrated, your projector should display an image corrected for your screen material and lighting conditions that is as close as possible to how the director intended you to see it. After completion of your audio calibration, you will get much better dialogue intelligibility. The bass will be much tighter and more accurate, with reduced decay time.
AV equipment manufacturers invest a lot of time and resources collaborating with organisations like Calman, ISF, PVA, Dirac, THX and many more. They know these organisations have the knowledge and tools to get the best out of their electronic equipment.
You can’t just copy the settings from another calibrated system into yours and expect great results. Calibration, both audio and video, is entirely room-specific.
Cinema seating
Good-quality recliner seats with 3-way independent reclining motors give you ultimate control over your seat position and comfort. We highly recommend investing in good-quality motorised recliners for your home theatre. Allocate a budget of $7000 for single-row and $14000 for double-row seating.
Installation- New Home vs Retrofit
Running cables through existing walls that are already sheeted is almost always more challenging and time-consuming than new builds. Allow 25-35% more labour cost for retrofit systems.
Crestron Home Integration
Most equipment today can be chain-linked to turn on and off using HDMI CEC. Complexity arises when you have multiple video sources connected to your AVR. You may have a few blinds and lights that you would like to control from a home automation system. It can even extend to controlling the HVAC system. Imagine walking into your luxury cinema room, where everything shifts to your favourite scene at the touch of a button. You can put all the remote controllers away and control all your AV gear from one single universal remote controller. That’s comfort and luxury at a different level. Bringing in a dedicated remote controller, a couple of wireless dimmers, and a wireless blinds motor controller from Crestron can cost upwards of $5000.
LUMIFI is an authorised ‘Crestron Home’ dealer. We have a fully working Crestron Home set-up in our Fyshwick showroom in Canberra.
Professional Installation: Avoid costly mistakes
Equipment cost and labour cost are two separate line items. For a Canberra home theatre project, professional design, cabling, project management and installation typically adds $2000 $5000 to the total, depending on complexity. Here is what that investment covers.
Free On-site consultation and system recommendations
We will come out to meet you on-site. During this on-site consultation, we'll listen to your wish list and everything you want your dream home theatre to be. We will ask a few questions about the screen size, the seating layout, and how much you are planning to spend on the system. After this initial consult, we will go to the drawing board and come up with a few recommendations and options, specifically tailored to your wish list and budget. At this stage, we will give you a true expected performance outcome from each proposed system and seek further direction from you. Everything up to this point is free.
Custom Design, Not Off-the-Shelf Packages
If you have read this entire document, you will understand that every home cinema we provide in Canberra is individually tailored to the customers’ needs and budgets. Designing a system requires time and effort. We charge a fee for our detailed design and proposal documents. This document includes the micro and macro details of all equipment, speaker placement, subwoofer placement, cabling details, and media unit requirements. This document will give you the freedom to outsource your cabling and installation services if you so wish. The expected cost of providing the design document can range from $660 to $1100, depending on the system size and level of detail required to pass on to third parties.
Supply of Cables and rough-in
The time required to run cables in a new build versus an existing house differs greatly. The HDMI cable is usually a fixed
cost, but the number of speakers and subwoofers determines how much cable and time you need to complete the rough-in. We always use high-quality cables and interconnects from Kordz, known for quality and reliability. Having an expert complete your infrastructure helps ensure you don’t make costly mistakes. Please note,we strongly recommend not using cheap, untested HDMI cables, as they can give you (and us) all sorts of connectivity problems. We also cater for situations where we just come in and complete the rough-in for you. Our complete supply and installation service for cables and infrastructure can
range from $1500 to $2000.
Project Management
This fee is usually only applicable if you get your system designed by us but have the installation completed by a third party. During these site visits, we make sure everything in our design is followed through (by third-party installers) and to ensure we avoid any errors that could cause problems at the installation stage. Expect to pay up to $500 for this service if you decide to get third parties to do your infrastructure.
Installation, set up and hand over
Installation is usually completed over two or three site visits. The first visit in this stage is usually immediately after plastering is complete and just before any paint goes on the walls or the ceiling. During this visit, we cut openings for all in-wall and in-ceiling speakers. We prefer not to install any equipment while the house is not locked up and secure. The next visit is usually when the house is fully painted and cleaned up, as we require a dust-free environment to stretch the screen. During this visit, we usually complete the entire assembly and installation. It involves installing and connecting the speakers and subwoofers. We assemble and install the projector bracket and screen, then install and align the projector. We will then set up your AVR with the right speaker and subwoofer configuration. We will then get you to make your favourite video source available so we can get a picture on your screen. Installation and setup usually cost $1000 to $1500.
Dirac Calibration
Dirac calibration requires that there is no external noise in and around the home theatre. It also requires you to invest in
a Dirac license, which you can purchase directly from Dirac. Prices of Dirac licenses range from US$99 to $899. We charge $400 for Dirac Calibration.
Our home theatre packs-complete supply and install - all done for you
Don't feel like going through all the details and want to have a system that just works, click here to visit our page to see our completely installed packages.
THE DIFFERENCE
Before/after
A side-by-side look at how thoughtful lighting and system design transforms a space.

Before

After
Expert Advice
Get Help from Experts, at the Right Time.
Designing and installing a high-end home cinema is far more complex than placing a projector, screen and speakers in a room. Our specialists bring years of experience in room acoustics, speaker placement, projector positioning and audiovisual calibration — ensuring your investment performs flawlessly from day one.